Getting started with AJO
RDlab@lsi.upc.edu
May 2014
 Welcome to LSI.
Introduction
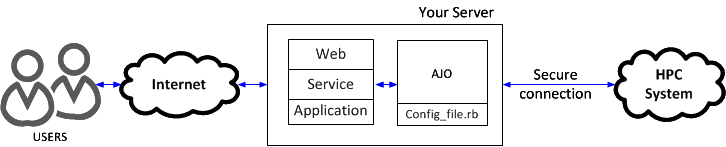
AJO (“garlic” in Spanish) stands for Asynchronous Job Operator. This useful tool was designed and developed to provide a transparent gateway between your web, application or service and a HPC system.
AJO transparently moves your executions to a Distributed Resource Management Application API (DRMAA), compatible queue system, such as Grid Engine or TORQUE, allowing you to submit, execute and retrieve any kind of greedy task in an easy and fast way.
The homepage of this project and further documentation can be found at http://rdlab.lsi.upc.edu/ajo. For further support contact RDlab at rdlab@lsi.upc.edu.
AJO functionalities
AJO provides three main functionalities which allow you to control the whole execution process.
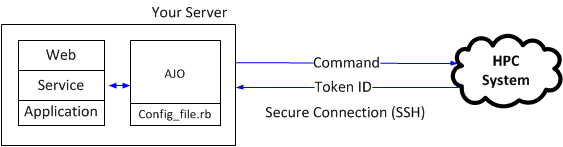
- SUBMIT: Sends a job to the HPC system and returns a safe-generated Token ID.
- QUERY: Checks the status of an already sent job.
- RETRIEVE: Gets the result of a finished job.

Moreover, there are some extra features that complete functionality. Please refer to the “Running and testing AJO” section for further information on all the options.
- LIST: Show a list of the identifiers of your jobs submitted using AJO.
- CANCEL: Cancels a running job submitted through AJO.
- ERASE: Erases the information at the server of a job submitted through AJO.
Installation
To run AJO you will need a GNU/Linux system with Ruby 1.9.1 or newer installed and an SSH client. You will also need a working compatible queue system, for example one of Grid Engine family.
The most recent version of AJO is available at our SVN repository using “public_ajo” as the username and password:
svn co http://svn-rdlab.lsi.upc.edu/subversion/ajo/public --username public_ajo
Configuring AJO
Warning: All the tasks performed by AJO are stored in the HPC users' home ($HOME/.executions) by default.
General options
In the directory where you download AJO you will find several files, including a configuration example called config.rb. This script contains all the options necessary for AJO to run correctly.
The first section allows you to determine basic options such as the server to connect to or the username to use, as well as the directory to store information at the server of the ssh binary location.
# SSH options

				SERVER = "server.name.domain"

				USER = "username" # insert your Linux username between quotes

				SSH_CMD = "/usr/bin/ssh #{USER}@#{SERVER}"

				AJO_DIR = `#{SSH_CMD} 'echo $HOME'`.chomp("\n") + "/.executions"
Besides, AJO issues direct SSH commands to the cluster, so it is necessary to use password-less SSH login through a pair of private/public keys. For further information about using SSH without a password please visit: http://www.debian-administration.org/articles/152
If AJO is executed by a system service with its own user (e.g. Apache or Tomcat) the keys must be placed at the $HOME/.ssh of the user that executes these services.
Besides, if this user needs to establish connection to the server with more than one user (user1, user2), it is necessary to use a config file at its $HOME/.ssh. The public key can be concatenated in just one file (id_rsa.pub), but private keys need their own fail each one, so a configuration file is necessary to specify where is each user’s private key file.
Below is shown an example on how could this file look like, assuming that /var/www is Apaches user’s (www-data) home.
			root@machine: cat /var/www/.ssh/config

				Host server

				HostName server.domain.com

				IdentityFile ~/.ssh/id_rsa.user1

				User    user1


				Host server

				HostName server.domain.com

				IdentityFile ~/.ssh/id_rsa.user2

				User    user2
Grid Engine and encryption options
In this section you will find the main SGE options like paths to the binaries, architecture, etc. You are advised not to modify this section unless it is strictly necessary. Below you can find an example:
				# SGE options, normally you will not have to change this.

				SGE_ROOT = `#{SSH_CMD} 'echo $SGE_ROOT'`.chomp "\n"

				SGE_ARCH = `#{SSH_CMD} '#{SGE_ROOT}/util/arch'`.chomp "\n"

				SGE_UTIL_PATH = SGE_ROOT + "/bin/" + SGE_ARCH

				QSUB_CMD = SGE_UTIL_PATH + "/qsub"

				QSTAT_CMD = SGE_UTIL_PATH + "/qstat"

				QACCT_CMD = SGE_UTIL_PATH + "/qacct"

				QDEL_CMD = SGE_UTIL_PATH + "/qdel"
Moreover, AJO uses an encryption system to create a safe Token ID for every job submission to ensure trustability between the application and the HPC system. This section holds the parameters used for the job information encryption.
You should change the salt value to something random, and also change USER and SERVER constants in the consequent lines to something more secure, like “ajksdbh8os7dtfg8wky” or “I5787s4wa%^W/3w6u43” strings for better encryption. Please note that quotes must be used.
				# Encryption options, replace USER and SERVER in second and third lines with

				# something random for more security. But be careful - loosing CIPHER_KEY

				# and CIPHER_IV will make decoding your job identifier impossible.

				CIPHER_SALT = "ajo"

				CIPHER_KEY = OpenSSL::PKCS5.pbkdf2_hmac_sha1(USER, CIPHER_SALT, 2000, 16)

				CIPHER_IV = OpenSSL::PKCS5.pbkdf2_hmac_sha1(SERVER, CIPHER_SALT, 2000, 16)
Folder and file arguments
AJO packs your local data and sends a copy to the HPC system (at $HOME/.executions by default), so the input files and directories must be defined in the configuration file. Therefore, you should also define the output files to retrieve the proper data after the execution.
At the configuration file, after the general options section you can see some blocks of file and folder arguments. These are Ruby key-value hashes. Mind that the key is a symbol (a special kind of string variable, which starts with a semicolon) and the value is a string. You can add or remove as much key-value pairs as necessary. The pairs with empty values will be ignored.
The first block, FOLDER_ARGS, allows you to specify the folder arguments you are going to use in your cluster command. You can use relative or full paths and shortcuts like '~'. System's Bash variables will also work just fine. This is an example of usage of this variable:
FOLDER_ARGS = {

			    :fld1 => "~/folder42",

			    :fld2 => "",

			    :fld3 => "",

			}
The next variable, FILE_ARGS, allows you to select files which you will want to use later in the command. The format is the same as in the previous block:
FILE_ARGS = {

			    :file1 => "~/file42",

			    :file2 => "",

			    :file3 => "",

			}
Next block shows the output variables. FOLDER_OUTPUT and FILE_OUTPUT have the same format and functions as the arguments discussed above, but these will be later available for easy retrieval, as you will be able to download all the output files quickly after the job execution is finished. These ones look as follows:
FOLDER_OUTPUT = {

			    :fld1 => "outputfolder42",

			    :fld2 => "",

			    :fld3 => "",

			}


			FILE_OUTPUT = {

			    :file1 => "file1.txt",

			}
The last variable is RETRIEVE. This one specifies the output files you will want to retrieve after job execution. This variable looks like:
RETRIEVE = {

			    :folder1 => "file1.txt",

			}
Finally, the command processing block comes. Here you can write the commands you want to execute on the cluster. The format of file arguments you use here is a bit tricky:
- First, the variables you configured above are accessed via their names in lowercase. This is done for the file paths to be processed correctly before the job is launched.
- Second, commands are strings. You will have to avoid using double quotes (“) inside the commands or escape them (by typing \”).
To use the preconfigured arguments to the command you will have to use string interpolation. In Ruby it is done by typing #{variable} (hash sign and variable name between curly brackets).
For instance, if you want to print ‘file1’ from ‘FILE_ARGS’, you will have to access the argument by its name in lowercase, in this case ‘file_args’, and then access the specific entry in this argument with entry's name between square brackets:
“cat #{file_args[:file1]}”.
Hence, this is how the final command will look like:
				def process_commands file_args, folder_args,folder_output, input_dir, output_dir[

				    "uname -a > #{file_output[:file1]}",

				    "echo 'hello' > #{file_output[:file1]}"

				]

				end
Running and testing AJO
AJO is run at the command line interface (CLI). These are the options available:
				--api

				    Ask AJO to print only concise output. Useful if the output is going to be parsed.


				-c FILE or --config FILE

				    For every action AJO needs a configuration file, as it uses the SSH options specified there for a lot of operations. By default it searches for a configuration file with the name config.rb in the current directory unless you call AJO with a -c FILE
option where FILE is the new configuration file.


				-d DIR or --retrieve-directory DIR

				    Download the results of the execution to ‘DIR’.


				--download-exec-folder ID

				    Downloads the folder where the job is executed at the HPC system.


				-e ID or --erase

				    Erase the directory associated with the job at the server.


				-l or –list

				    List all the identifiers available for query and retrieval.


				--library FILE

				    Specify libhpc location.


				--log-all

				    Make AJO log every step it takes while executing tasks.

				    By default, AJO creates a log file in the current directory called AJO.log and writes only fatal error messages there. The file is refreshed daily. If you have any problems with AJO, you can run your command with the --log-all key for deeper information.


				-q ID or --query ID

				    Get the information about the status of the job with id=ID.


				--qstat ID

				    Gets the output of the qstat call for the job with id=ID.


				--qstat-xml ID

				    Gets the XML output of the qstat call for the job with id=ID.


				-r ID or --retrieve ID

				    Download the results of the execution of the job specified by the ID.


				-s or --submit

				    Submit the job you have specified in the configuration file to the cluster.


				-v or –version

				    Make AJO print its version and exit.


				-x ID or --cancel ID

				    Cancel a running job.
Examples
The standard operations with AJO can include job submission, querying the cluster asking if it has finished running, getting the results and erasing the job files from the cluster.
To submit the job you will have to run the next command:
AJO -c config.rb -s
This will tell AJO that the configuration file you want to use is config.rb in current directory, and that you want to submit the job described in it to the cluster. The command will return you an identifier that you will later use for other operations.
To query the job:
AJO -c config.rb -q identifier_here
The command will return the message describing the status of the job.
To get the results:
AJO -c config.rb -r identifier_here
You can also specify the directory that you want to download everything to with -d directory and that you want all the output with -a.
To erase the job files from the cluster:
AJO -c config.rb -e identifier_here
To list the identifiers of the jobs available for retrieval:
AJO -c config.rb –l
After setting up AJO, you can try if everything works as it should work by running this command. If you have never submitted jobs to your queue system with AJO, the output will be an empty line. If you get an error, check the syntax in the configuration file (you may have forgot some commas, semicolons, etc.), update Ruby's dependencies, verify your network interface and verify the SSH connection.